vendredi 4 septembre 2026

Most people get this wrong and toss out the can. The right way to read ‘Best By’ or ‘Best Before’ dates.

by


In the world of packaged foods, “Best By” and “Best Before” dates are ubiquitous, yet often misunderstood. Contrary to popular belief, these dates do not signal when food becomes unsafe to eat, but rather when it is likely to be at its peak flavor and texture. Unfortunately, this confusion leads many people to discard perfectly good food, contributing to the growing problem of food waste. Learning how to properly interpret these labels—especially when it comes to canned goods—can help consumers make smarter, more sustainable choices.

Understanding the Purpose of ‘Best By’ Dates

‘Best By’ dates are set by manufacturers to indicate the period during which the food is expected to maintain its best flavor, color, and nutritional quality. These dates are based on factors like the type of food, packaging materials, and expected storage conditions. In most cases (with the exception of infant formula), these dates are not federally regulated, meaning they serve as guidance—not a safety deadline.

Common Misconceptions About Expiration Dates

One of the most widespread misconceptions is treating ‘Best By’ dates as hard expiration deadlines. While a product may lose some freshness or texture after this date, it’s usually still safe to consume if it shows no signs of spoilage. This is particularly true for shelf-stable items such as canned foods, which can often last years beyond their date when stored correctly.

‘Best By’ vs. ‘Use By’: What’s the Difference?

‘Best By’: Indicates when the product will be at its best quality.
‘Use By’: Often found on perishable items like dairy or deli meats, this date is more safety-oriented. It should be more closely followed, especially for high-risk items.
Understanding the difference helps avoid unnecessary waste while ensuring food safety.

How Long Do Common Canned Foods Last Past the ‘Best By’ Date?

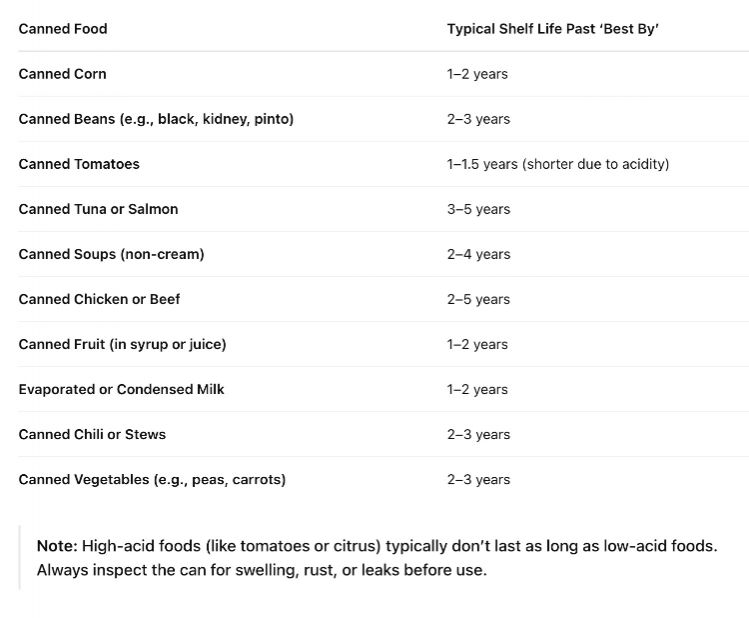
Below is a breakdown of typical shelf lives after the ‘Best By’ date for common canned foods, assuming proper storage (cool, dry location, and intact packaging):
Using Your Senses: How to Evaluate Food Safety

Even past the ‘Best By’ date, many canned goods remain safe to eat. Use this checklist:
Look: Check for bulging lids, rust, dents (especially on seams), or leakage.
Smell: Any sour, metallic, or rotten odors? Discard it.
Taste: If the can looks and smells fine, taste a small amount. If it tastes off, don’t eat it.


see continues on the next page

[page]


Storage Matters: How to Extend the Life of Your Food

The longevity of canned food depends heavily on how it’s stored:
Temperature: Store in a cool (50–70°F), dry place.
Humidity: Keep cans away from damp basements or warm garages.
Light: Avoid direct sunlight to prevent degradation of flavor and nutrients.
Proper storage can help many canned foods last far beyond their suggested dates.

The Environmental and Economic Cost of Food Waste

Throwing away food that’s still safe not only hits your wallet but also harms the environment. In the U.S., over 30% of all food is wasted annually, contributing to excess landfill use and greenhouse gas emissions. Misinterpreting date labels plays a major role in this.

Tips to Reduce Food Waste Through Better Label Literacy

Don’t panic about dates—they’re about quality, not safety.
Rotate pantry items so older products are used first (FIFO: First In, First Out).
Buy only what you need, especially with perishable goods.
Donate non-perishables nearing their ‘Best By’ date to local food banks if you won’t use them.

Conclusion: Be Smart About Shelf Life

Understanding the meaning of ‘Best By’ and ‘Best Before’ dates—especially for canned foods—can empower consumers to reduce waste, save money, and be more sustainable. By using your senses, practicing smart storage, and knowing typical shelf lives, you can confidently make the most out of your pantry staples.

Reuben Crescent Bake

by


If you’re a fan of the classic Reuben sandwich and the convenience of crescent roll recipes, then you’re in for a treat! In this article, we’ll explore the step-by-step guide for preparing a delightful Reuben Crescent Bake. This recipe brings together the savory goodness of corned beef, sauerkraut, Swiss cheese, and Thousand Island dressing, all wrapped in a buttery crescent dough. With its irresistible flavors and visually appealing presentation, the Reuben Crescent Bake is perfect for family gatherings, potlucks, or any occasion when you want to impress your guests.

Ingredients
IngredientsQuantity
Crescent roll dough2 tubes
Corned beef slices1 pound
Swiss cheese slices8 ounces
Sauerkraut1 cup
Thousand Island dressing1/2 cup
Egg (for egg wash)1
Caraway seeds (optional)1 teaspoon
Poppy seeds (optional)1 teaspoon


Now that we have our ingredients ready, let’s get started with the cooking process!


Preparing the Reuben Crescent Bake


see continues on the next page

[page]


Preparing the Reuben Crescent Bake

  1. Preheat the Oven: First, preheat your oven to 375°F (190°C) to ensure it’s ready for baking later.
  2. Unrolling the Crescent Dough: Lay out the two tubes of crescent roll dough on a clean surface. Gently unroll the dough, being careful not to tear it. You should end up with eight triangles from each tube.
  3. Layering the Fillings: On each crescent triangle, layer a slice of corned beef, followed by a slice of Swiss cheese. Top the cheese with a spoonful of sauerkraut and drizzle some Thousand Island dressing over it. If you prefer a more pronounced flavor, you can sprinkle some caraway seeds on top.
  4. Rolling Up the Crescents: Carefully roll up each crescent triangle starting from the wide end and tuck in any loose ends to secure the fillings within the dough.
  5. Egg Wash: In a small bowl, beat the egg and brush it over the tops of the rolled-up crescents. This will give them a beautiful golden-brown finish when baked.
  6. Optional Poppy Seeds: For added visual appeal and a slight nutty taste, you can sprinkle some poppy seeds over the crescents before baking.
  7. Arranging on Baking Sheet: Place the prepared crescents on a baking sheet lined with parchment paper, making sure to leave enough space between them to allow for slight expansion during baking.
  8. Baking Time: Slide the baking sheet into the preheated oven and bake the Reuben Crescent Bake for approximately 15-20 minutes or until the crescents are golden brown and cooked through.
  9. Serve and Enjoy: Once the crescents are baked to perfection, remove them from the oven and let them cool for a few minutes. Then, serve them warm, and watch as your family and friends delight in this scrumptious dish!


Lemon Shrimp Pasta 🍋🍤

by


If you’re looking for a restaurant-quality dish that comes together effortlessly at home, this Lemon Shrimp Pasta is the perfect choice. With its light and creamy sauce infused with zesty lemon, garlic, and a touch of white wine, it delivers a balance of bright, fresh flavors and indulgent richness. The tender, juicy shrimp complement the al dente pasta beautifully, making this dish both impressive and incredibly satisfying.


see continues on the next page

[page]


As a chef, I’ve always admired how Italian-inspired recipes can transform simple ingredients into something extraordinary. This recipe is no exception. It’s quick to prepare — ready in just 15 minutes — and uses pantry-friendly staples like pasta, butter, garlic, and lemon. Add a splash of wine and some plump shrimp, and you’ll have a dish that rivals your favorite seafood restaurant. The creaminess of the sauce, paired with the tang of lemon juice and zest, creates a silky finish that will keep you coming back for more.

What makes this recipe shine is its versatility. It’s elegant enough for a dinner party but easy enough for a weeknight meal. Whether you’re cooking for two or doubling the recipe to feed a family, it’s a guaranteed hit. Plus, it pairs wonderfully with a simple green salad or some crusty bread to soak up the leftover sauce.

Shrimp lovers will appreciate how quickly this seafood cooks to perfection. The key is to lightly sear the shrimp, ensuring they remain tender and juicy, then toss them back into the creamy, garlicky sauce for the final finish. Combined with linguine or your pasta of choice, the result is a vibrant and luxurious dish that feels like a mini-vacation in every bite.

For a dish that delivers on flavor, elegance, and ease, this Lemon Shrimp Pasta is a must-try. It’s light yet comforting, bursting with fresh lemon, and rich enough to feel indulgent — the perfect recipe to elevate your home-cooked meals.

Ingredients :

  • Butter: 1 tablespoon
  • Olive Oil: 1 tablespoon
  • Tiger Shrimp: 14 large, peeled and deveined
  • Garlic: 4 cloves, minced
  • Chili Flakes (optional): A pinch
  • White Wine or Vegetable Stock: 1/3 cup
  • Heavy Cream (or coconut cream): 1/4 cup
  • Salt and Pepper: To taste
  • Lemon Zest: From 1 lemon
  • Lemon Juice: To taste
  • Pasta: 150 grams dry linguine (or pasta of your choice), cooked
  • Pasta Water: A splash (reserved from cooking the pasta)
  • Parsley: Chopped, for garnish

Instructions :

  1. Prepare the Shrimp:
    • In a large skillet over medium heat, melt the butter and olive oil until shimmering.
    • Add the shrimp and cook for 1-2 minutes per side, or until they turn pink and opaque. Remove the shrimp from the skillet and set aside.
  2. Make the Sauce:
    • In the same skillet, reduce the heat to low and add the minced garlic and chili flakes (if using). Sauté for about 30 seconds until fragrant.
    • Pour in the white wine (or vegetable stock) and let it simmer for 2-3 minutes to reduce and thicken slightly.


My coworker brought these to every morning meeting. Just 3 ingredients. Fluffy, savory goodness that completely melts in your mouth.

by


Low-Carb 3-Ingredient Egg Bites These low-carb 3-ingredient egg bites are an easy, protein-packed breakfast that’s perfect for busy mornings. Made with eggs, shredded cheese, and crispy bacon, they bake into soft, fluffy bites that are great for meal prep, quick breakfasts, or a satisfying snack. With just a few simple ingredients and minimal effort, you can enjoy homemade egg bites that are both delicious and convenient. Ingredients 8 large eggs 1 cup shredded cheese (cheddar, Colby Jack, or your favorite variety) 1 cup cooked, crumbled bacon (about 8 slices) Nonstick cooking spray, oil, or butter for greasing the muffin pan…

see continues on the next page

[page]


Low-Carb 3-Ingredient Egg Bites

These low-carb 3-ingredient egg bites are an easy, protein-packed breakfast that’s perfect for busy mornings. Made with eggs, shredded cheese, and crispy bacon, they bake into soft, fluffy bites that are great for meal prep, quick breakfasts, or a satisfying snack. With just a few simple ingredients and minimal effort, you can enjoy homemade egg bites that are both delicious and convenient.

Ingredients

  • 8 large eggs
  • 1 cup shredded cheese (cheddar, Colby Jack, or your favorite variety)
  • 1 cup cooked, crumbled bacon (about 8 slices)
  • Nonstick cooking spray, oil, or butter for greasing the muffin pan

Instructions

Step 1: Prepare the Oven

Preheat your oven to 350°F (175°C). Lightly grease a standard 12-cup muffin pan with cooking spray, oil, or butter to prevent sticking.

Step 2: Beat the Eggs

Crack the eggs into a medium bowl or large measuring cup. Whisk until the eggs are fully combined and slightly frothy.

Step 3: Add the Fillings

Stir the shredded cheese and crumbled bacon into the beaten eggs until evenly mixed.

Step 4: Fill the Muffin Pan

Pour the egg mixture evenly into the prepared muffin cups, filling each about three-quarters full. Gently tap the pan on the counter to remove any large air bubbles.

Step 5: Bake

Bake for 15–18 minutes, or until the egg bites are puffed, the centers are fully set, and the tops are lightly golden.

Step 6: Cool and Serve

Let the egg bites cool in the pan for 3–5 minutes. Carefully loosen the edges with a butter knife or small spatula and remove them from the pan. Serve warm or allow them to cool completely before storing.

Storage

Store leftover egg bites in an airtight container in the refrigerator for up to 4 days. Reheat in the microwave for 20–30 seconds. They can also be frozen for up to 2 months; thaw overnight in the refrigerator before reheating.


Doctors reveal that avocado consumption causes…

by


Whether its on toast, in a burrito, as a dip, or even as a face or hair mask, if there’s one fruit masquerading as a vegetable that we can’t seem to get enough of, it’s avocado. Their creamy texture and light flavor, combined with many benefits for our health, have made avocados a staple in many people’s kitchens. While most of us regularly enjoy avocados with no issues whatsoever, most of us are not aware of some potential avocado side effects. These side effects can be from both eating them and also using them on your skin. Understand these potential risks and that risk may differ from person to person.

Potential Side Effects of Avocados
It sounds a bit ridiculous talking about side effects of a food item that is so coveted for so many people. There are thousands, or probably even millions of people around the world who eat avocado every single day. The thought of avocados having potential side effects never even crossed my mind. As with anything, however, there are some potential side effects to be aware of. Avocados, whether used as food or as a skin care ingredient, may not be for everyone. Here are the potential avocado side effects to be aware of.

1. Skin Irritation

Many natural skin care promoters will talk about using avocado as a primary ingredient for a deeply moisturizing face mask. There are also versions of these masks for deep conditioning your hair and scalp. Many skin care brands have even jumped on the bandwagon, coming out with avocado-based creams and serums. When applied to the skin, avocado oil is generally well-tolerated and possibly safe for up to three months. However, some individuals may experience itching after using a cream containing avocado oil and vitamin B12. If you have never used avocado on your skin before, consider testing it out first on a hidden patch of skin elsewhere on your body to see how your skin reacts. As always, if you are using avocado or avocado-based products and start to notice an adverse reaction, stop use immediately. If the reaction doesn’t go away quickly, consult your doctor or dermatologist.


see continues on the next page

[page]


2. Latex Allergy

Interestingly enough, individuals with a latex allergy may have an allergic reaction to avocados due to cross-reactivity. While those two products don’t seem to have any relation whatsoever, for whatever reason those with latex allergies or sensitivities are also more likely to have allergic reactions to avocados.
3. Stomach Allergy in Infants and Children


Chef’s Perfect Scrambled Eggs

by


These Perfect Scrambled Eggs prove that a few simple ingredients can create an exceptionally satisfying breakfast. Using gentle heat, a little patience, and plenty of butter, this method produces soft, creamy eggs with a rich texture and delicate flavor. The result is light, tender curds that stay moist and silky from the first bite to the last.

Whether served on toast, alongside fresh fruit, or as part of a larger breakfast spread, these scrambled eggs are an easy way to elevate your morning routine.

Ingredients

Egg Mixture

IngredientAmount
Large eggs3
Unsalted butter, divided1½ tablespoons
Whole milk, heavy cream, or crème fraîche (optional)1–2 tablespoons

Seasonings & Garnishes

IngredientAmount
Fine saltPinch
Freshly ground black pepperTo taste
Fresh herbs (chives, dill, or tarragon), chopped1 tablespoon (optional)
Flaky sea salt or hot sauceOptional, for serving


see continues on the next page

[page]


Directions

Step 1: Whisk the Eggs

Crack the eggs into a bowl. If desired, add the milk, cream, or crème fraîche for extra richness. Whisk gently until the yolks and whites are combined.

Kitchen Tip: There’s no need to whip the eggs until frothy. A lightly mixed mixture helps create soft, tender curds.

Step 2: Prepare the Pan

Place a nonstick skillet over low to medium-low heat. Add 1 tablespoon of butter and allow it to melt slowly, coating the bottom of the pan.

The butter should melt gently without browning.

Step 3: Cook Slowly

Pour the eggs into the skillet. Using a silicone spatula or wooden spoon, stir slowly and continuously, moving the eggs from the edges toward the center.

As the eggs begin to set, gently fold them over themselves. Continue cooking at a relaxed pace for about 3–5 minutes.

Step 4: Watch for Doneness

The eggs are ready when they form soft, creamy curds that still appear slightly glossy and moist.

Avoid cooking until completely dry, as the eggs will continue to cook after being removed from the heat.

Step 5: Finish with Butter

Remove the skillet from the heat while the eggs are still slightly underdone. Add the remaining ½ tablespoon of butter and any fresh herbs, stirring gently until the butter melts into the eggs.

Season with salt and black pepper.

Kitchen Tip: Adding the final bit of butter at the end helps create a smooth, rich finish while preventing overcooking.

Step 6: Serve Immediately

Transfer the eggs to a warm plate right away. Serve while soft, fluffy, and hot.

Serving Suggestions

Enjoy with buttered toast, avocado, smoked salmon, sautéed vegetables, or fresh fruit. For extra flavor, finish with flaky sea salt, chopped herbs, or a few drops of your favorite hot sauce.

These simple scrambled eggs come together in less than 10 minutes and deliver restaurant-quality results with minimal effort.


Cheesy Taco Crescent Pie

by


This cheesy taco crescent pie is an easy, comforting dinner with a flaky crescent crust, seasoned Beef, and plenty of melted cheese. You’re going to love how quickly it comes together with simple ingredients and no homemade pastry. It’s warm, filling, and perfect for busy nights when everyone is hungry.

Why You’ll Love It
Flaky crescent crust — no rolling pin, floury counter, or homemade pastry required.
Smart cheese layer — melted cheese underneath the beef helps keep the crust from getting soggy.
Simple pantry seasoning — chili powder, cumin, paprika, salt, and pepper give the beef taco flavor.
Easy to serve — it makes six reasonable portions and slices neatly after a short rest.
Weeknight-friendly — pair it with a green salad, corn, or tortilla chips and salsa for an easy dinner.
Ingredient Notes
The whole charm of this pie is that it starts with three main ingredients: refrigerated crescent roll dough, ground beef, and shredded Mexican blend cheese. The seasoning is pantry stuff, and I refuse to count it as “extra” because then nothing in life is simple anymore.

Use the regular crescent roll dough in the tube—not the sheets, unless that’s what you have. The sheets will work, actually, and are a little less fiddly since there are no triangle seams. So I suppose I just contradicted myself. Either is fine. With the triangles, you arrange the wide ends around the outer edge of the pie dish and point the skinny ends toward the center. It looks like a sunburst for about thirty seconds, then you press it all together and it looks like dough again.

I use ground beef that’s somewhere around 80/20 or 85/15. Leaner beef is fine, but it can be a little dry. If you go with turkey or Chicken, a teaspoon of oil in the skillet helps it brown without turning into pale little pebbles. Nobody wants pale little pebbles for supper.

For cheese, a bag of Mexican blend is easiest. Sharp cheddar is good too, pepper jack if your family likes heat, or the random ends of cheese bags lurking in your refrigerator drawer. You need about 2 cups total. I have used “almost 2 cups” and survived. We’re making dinner, not launching a satellite.


see continues on the next page
[page]


Ingredients
1 (8-ounce) can refrigerated crescent roll dough
1 pound ground beef
2 cups shredded Mexican blend cheese, divided—1 cup underneath, 1 cup on top
1 teaspoon kosher salt
1 teaspoon chili powder
1/2 teaspoon ground cumin
1/2 teaspoon smoked paprika or regular paprika
A few grinds of black pepper, however many feels right
A little oil or nonstick spray for the 9-inch pie dish
Cheesy Taco Crescent Pie

Instructions
Heat your oven to 375°F. Lightly grease a 9-inch round pie dish with oil or nonstick spray. I use spray because I am usually holding the phone with one hand, trying to answer somebody’s question about where their other shoe is. Make sure you get around the sides, too. The crust likes to cling in the corners.

Open the crescent roll tube. Do it over the counter, not directly over your head while talking to someone—yes, that happened once, and no, it was not one of my finer domestic moments. Unroll the dough and separate it into triangles. Arrange them in the prepared pie dish with the wide ends overlapping around the rim and the points toward the center. Press all those seams together with your fingers so you have one continuous crust covering the bottom and sides.

Brown the ground beef in a large skillet over medium-high heat, breaking it up as it cooks. It should take about 6 to 8 minutes to lose all its pink color. I use a wooden spoon, though the little metal meat-chopper tool is life-changing. It is fine. It is a gadget. We all have enough gadgets, but it’s not wrong.

If there’s a lot of grease in the skillet, carefully drain it off. This matters more than you’d think; extra grease can make that lovely crescent crust soggy. Then add the kosher salt, chili powder, cumin, paprika, and black pepper. Stir everything around and let it cook for another 1 to 2 minutes, until it smells warm and spicy. Taste a little, carefully—it’s hot. Add more salt or pepper if you need it.

Sprinkle 1 cup of the shredded cheese over the unbaked crust. Right on the dough. This is the cheese barrier, the unsung hero, the sensible shoes of the whole recipe.

Spoon the warm seasoned beef evenly over that cheese layer, all the way out toward the edges. Then scatter the remaining 1 cup of cheese across the top. I try to keep it fairly even, but there is always one corner with more cheese because apparently I am still twelve years old at heart.

Bake on the center rack for 18 to 22 minutes, until the crust is deep golden around the edges and the cheese is melted, bubbly, and getting a few browned spots. Keep an eye on it near the end. If the edges get dark too fast, loosely tent them with foil. Don’t wrap the whole dish tightly—then you’re steaming it, and we have already discussed soggy crusts.

Let the pie rest for 5 to 10 minutes before slicing. This is the hardest instruction in the entire recipe because everyone will be standing there with plates. But give it a minute. The cheese settles, and your wedges hold together better. A pizza cutter works beautifully here, though a sharp knife will do just fine.

Variations
For more heat, use pepper jack cheese and a pinch of cayenne in the beef, then pile shredded lettuce, tomatoes, and sour cream on each slice after baking. You can use hot Mexican blend cheese, too, or scatter in crushed red pepper before the top layer of cheese.

Ground turkey or Chicken works if that’s what you have, just add a teaspoon of oil to the skillet so it browns properly. And cheddar, pepper jack, Monterey Jack—use whatever shredded cheese is hanging around, as long as you still use about 2 cups.

One time I tried adding a layer of black beans and corn inside because I had lofty ambitions about stretching the meal. It tasted fine, but it was too full and the crust got overwhelmed. More is not always more. Sometimes more is just a mess in a pie plate. Serve black beans or corn on the side instead, and everybody stays happier.

If you want a crispier bottom, you can pre-bake the crescent crust for 5 minutes before adding the cheese and beef. I do that occasionally, though not when I’m in a hurry—which is most of the time.

Storage & Reheating
Leftovers keep covered in the refrigerator for a few days, assuming there are leftovers.

For the best reheating, warm slices in a 325°F oven or toaster oven for 10 to 15 minutes. The crust gets flaky again and the cheese wakes back up. The microwave will heat it, certainly, but the bottom turns soft. Sometimes that is the price of being hungry right now, and I understand that deeply.

I usually put a leftover slice in a container with a little salad or corn for lunch the next day. It’s not glamorous, but neither is standing in front of the refrigerator at noon eating shredded cheese from the bag, which I have also done.

Final Notes
There is something comforting about a dinner that doesn’t ask much of you. No special trip to the store, no chopping board covered in scraps, no stack of pans waiting afterward like a personal accusation. Just a pie dish, a skillet, that pop of the crescent dough tube, and supper.

I still think about that old apartment sometimes—the rattling window unit, instant coffee in a saucepan because there wasn’t a coffee maker, the ugly brown carpet that probably contained half the meals. That little crescent pie made dinner feel capable, and maybe that’s why I keep coming back to it.

Or maybe it’s just cheese and taco beef in a buttery crust. Honestly, that is reason enough.